A Deep Dive into the 3 Core Techniques for Controlling Prompts in ComfyUI


When creating images in ComfyUI, your prompts are the main language for communicating with the AI model. How can you precisely express your ideas to generate images that match your vision? Mastering these three core techniques will significantly boost your control over the results.
Technique 1: Control Element Importance with Word Order
Many beginners overlook a crucial detail: Words placed closer to the front of your prompt are generally treated as more important by the AI.
If you find a specific element isn't appearing prominently in your generated image, besides using weight brackets, the most straightforward method is to **move it toward the beginning of your prompt.
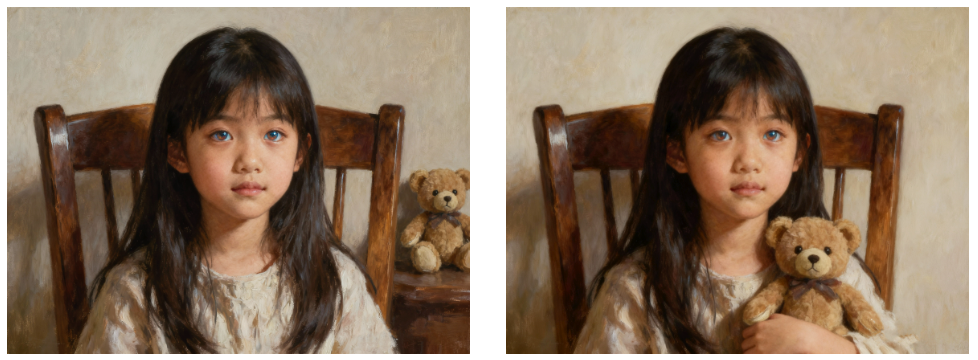
Practical Example
- Initial Prompt:
masterpiece, best quality, girl, shining eyes, pure girl, solo, long hair... (details omitted) ...teddy bear - Result: The "teddy bear," mentioned at the very end, was barely noticeable or ignored.
- Adjusted Prompt:
masterpiece, best quality, teddy bear, girl, shining eyes... (other words follow)... - Result: By moving "teddy bear" to the front, its presence and clarity in the image improved dramatically.
Key Takeaway: Place your most important subjects and core characteristics at the beginning of your prompt.
Technique 2: Isolate Element Descriptions with Prompt Comments
Sometimes, even after adjusting weights, certain descriptions (especially colors) can "bleed" and affect the entire scene. For instance, a word describing clothing color might incorrectly apply to hair or the background.
This is where prompt comments come in handy, allowing you to create isolated description zones for different subjects. The basic format is: subject\(comment1, comment2)
Practical Example
- Initial Prompt:
1girl, silver hair, blue eyes, (yellow business suit:1.4), slim body... black handbag... - Result: Even though the prompt specified a "black handbag," the highly weighted "yellow business suit" often caused the bag to render in yellow too.
- Adjusted Prompt:
1girl\(silver hair, blue eyes, (yellow business suit:1.4)), slim body... black handbag... - Result: By encapsulating the girl's description (including her yellow suit) within comments, the handbag correctly appeared black, isolated from the subject's color influence.
Key Takeaway: Use the\( )comment syntax to isolate descriptions when you need to assign independent attributes to different parts of your image.

Technique 3: Integrate a Translator Node - Stop App Switching
For non-native English speakers, constantly switching between translation apps and ComfyUI to craft prompts can be a cumbersome workflow. While some plugins offer dictionary-based translation, they fail with words outside their predefined lists.
You can solve this by installing the translation node from the **AlekPet Node Pack**, which handles Chinese-to-English translation directly within your ComfyUI workflow.
Setup Steps
- Install the Node:
Click "Manager" at the bottom right of the ComfyUI interface.
In the pop-up window, click "Install Node," search for "AlekPet."
Find the node pack, click "Install," and restart ComfyUI after installation.
2. Build the Translation Workflow:
From the node menu, navigate to "Add Node > AlekPet Nodes > Text > Translate Text (Argos Translate)."
To preview the translation, it's helpful to also add a "Preview Text" node (found under "Add Node > AlekPet Nodes > Extras").
3. Configure and Connect:
In the "Translate Text" node, set the source language to Chinese (zh) and the target language to English (en).
Connect the node's "text" output to the "text" input of the "Preview Text" node.
4. Translate and Use the Result:
Type your Chinese prompt into the "Translate Text" node's input box, e.g., "最佳质量,杰作,1女生,衬衫,牛仔裤,长发" (best quality, masterpiece, 1girl, shirt, jeans, long hair).
Click "Queue Prompt" to execute the translation. The translated English text will appear in the "Preview Text" node.
To use this translated text for image generation, connect it to a "CLIP Text Encode" node. By default, this node lacks a direct text input. Right-click on the "CLIP Text Encode" node, select "Convert To Input > Convert Text to Input" – this adds a "text" input port, allowing you to connect it to the "Preview Text" node's output.
Key Takeaway: The translator node seamlessly integrates Chinese prompts into your workflow, significantly improving efficiency and prompt accuracy for non-English users.
Unlock Full-Powered AI Creation!
Experience ComfyUI online instantly:
https://market.cephalon.ai/share/register-landing?invite_id=RS3EwW
Join our global creator community:
https://discord.gg/MSEkCDfNSW
Collaborate with creators worldwide & get real-time admin support.