ControlNet Practical Guide: A Deep Dive into Canny and SoftEdge Models

When using ComfyUI for AI image generation, ControlNet plays a key role in enabling structured and controllable image outputs.
Among its many tools, Canny and SoftEdge are two of the most widely used edge detection models. They extract outlines in different ways, allowing creators to precisely guide the structure and details of their generated images.
This guide explains the principles, parameters, and workflow setups for both models, helping beginners quickly master their use in ComfyUI.
1. Introduction to the Canny Model
Canny is one of the most widely adopted and essential models in ControlNet.
Based on a classic edge detection algorithm, it captures image contours with great precision and uses them to guide the generation of new images.
The preprocessed output from Canny looks like a finely drawn sketch with clean outlines — perfect for scenes that require clear structure and sharp edges.
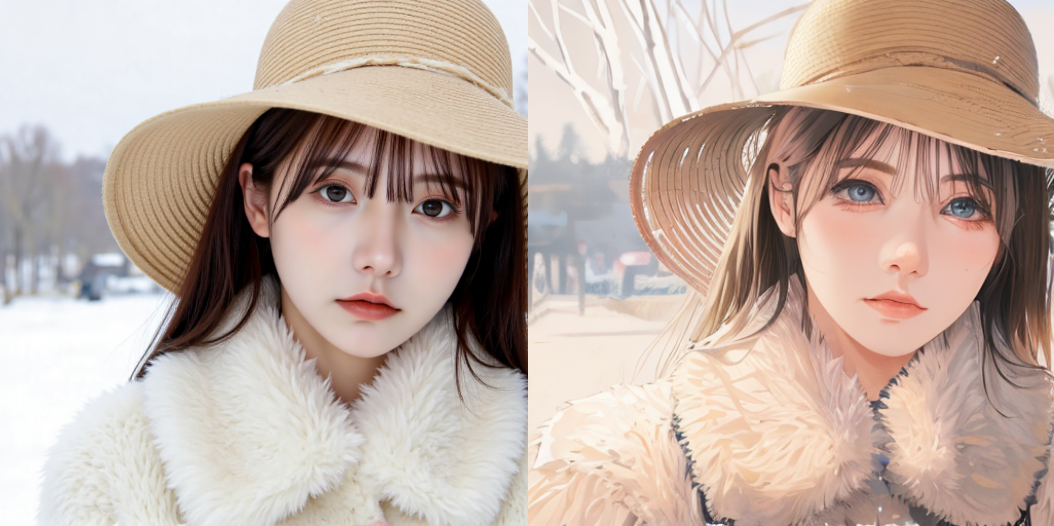
For example, when converting a realistic portrait into anime style, Canny helps preserve facial proportions and overall structure.
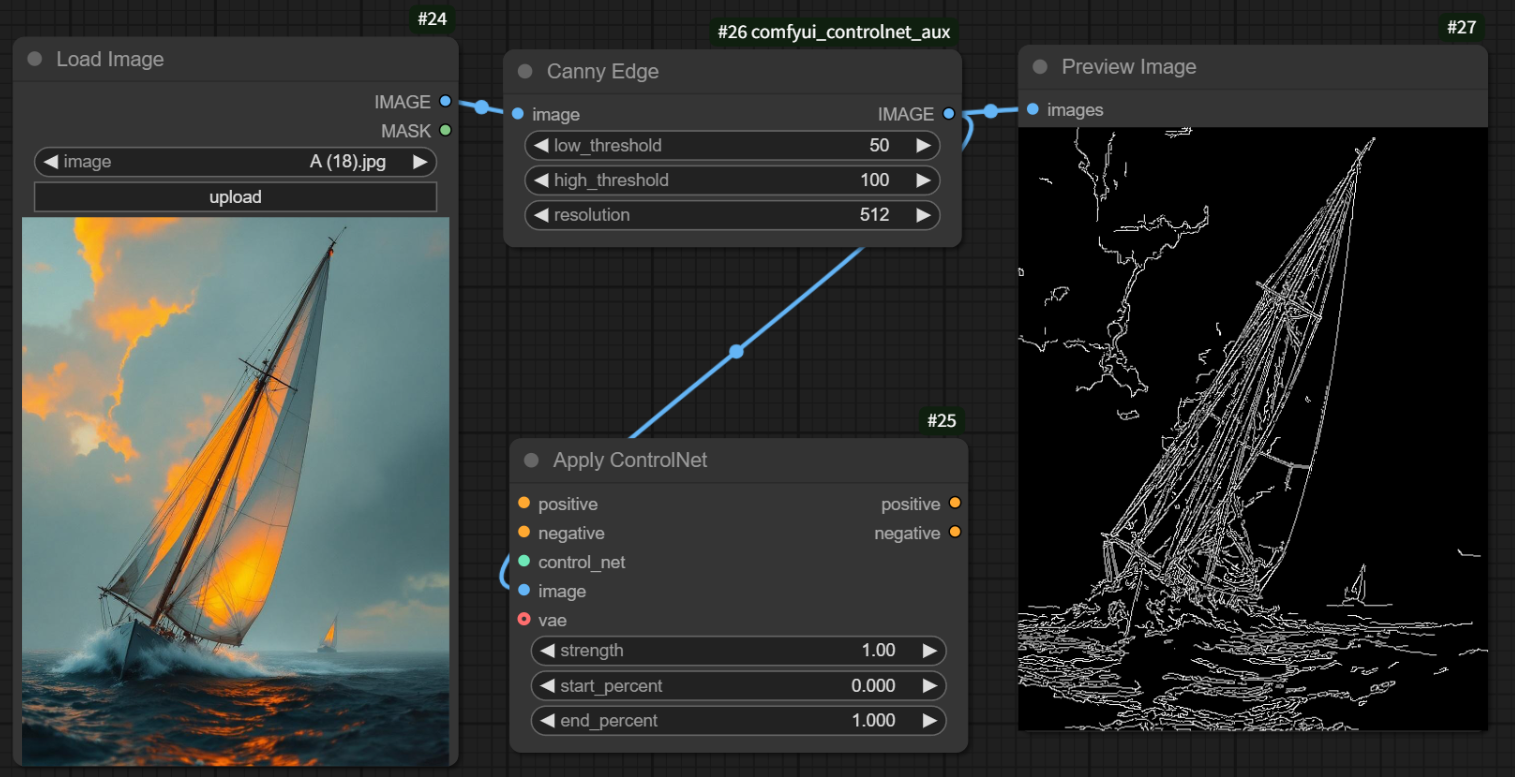
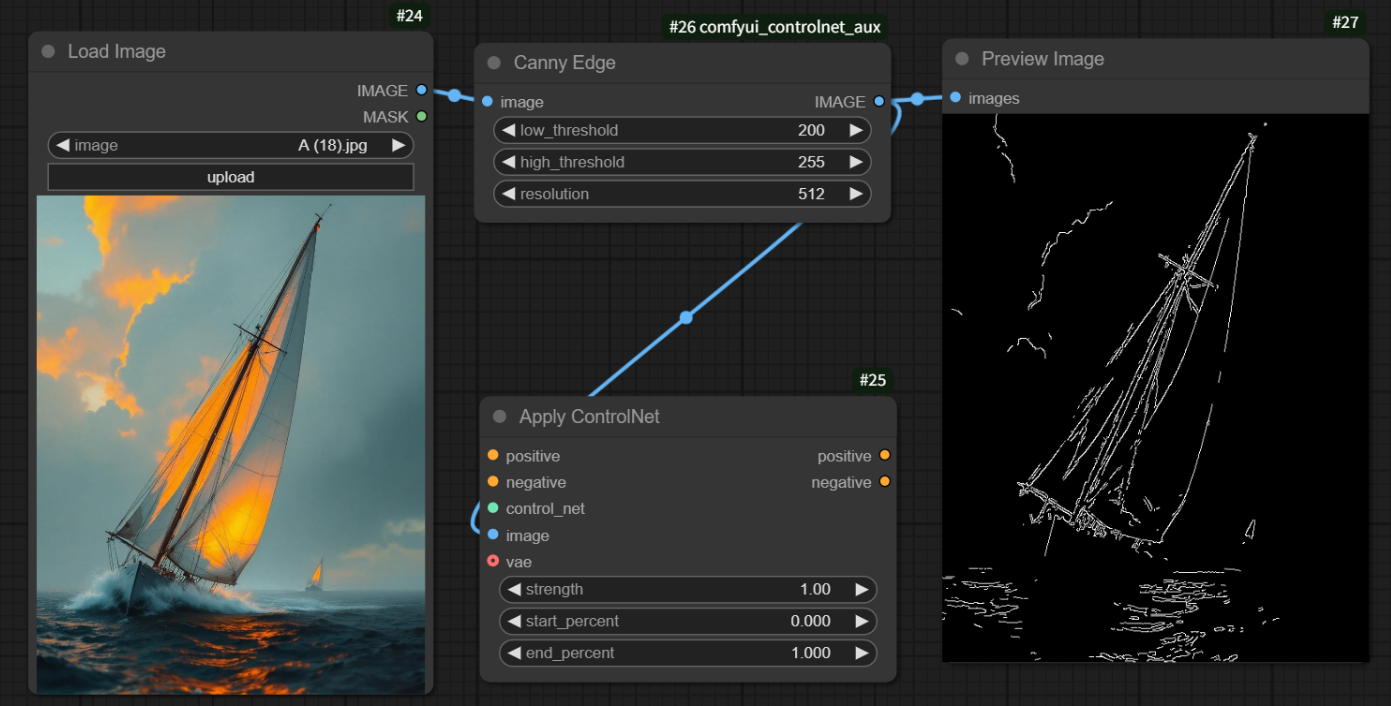
📌 Canny Preprocessor Node
Canny uses a single preprocessing node called the “Canny Fine Edge Preprocessor”, which consists of three main components:
- Low Threshold
- High Threshold
- Resolution
Threshold Settings
Thresholds control how detailed the sketch lines will appear, with values ranging from 1 to 255:
- Lower values → more complex lines, capturing finer details.
- Higher values → simpler lines, keeping only major outlines.
Canny’s “dual-threshold” logic works as follows:
- Above high threshold → strong edges, always kept.
- Between thresholds → weak edges, kept only if connected to strong edges.
- Below low threshold → ignored as noise.
You can fine-tune the thresholds to achieve your preferred sketch complexity:
too detailed may lead to noisy results, while too simple can reduce precision.
A typical range is 100–200, keeping resolution consistent with the original image.
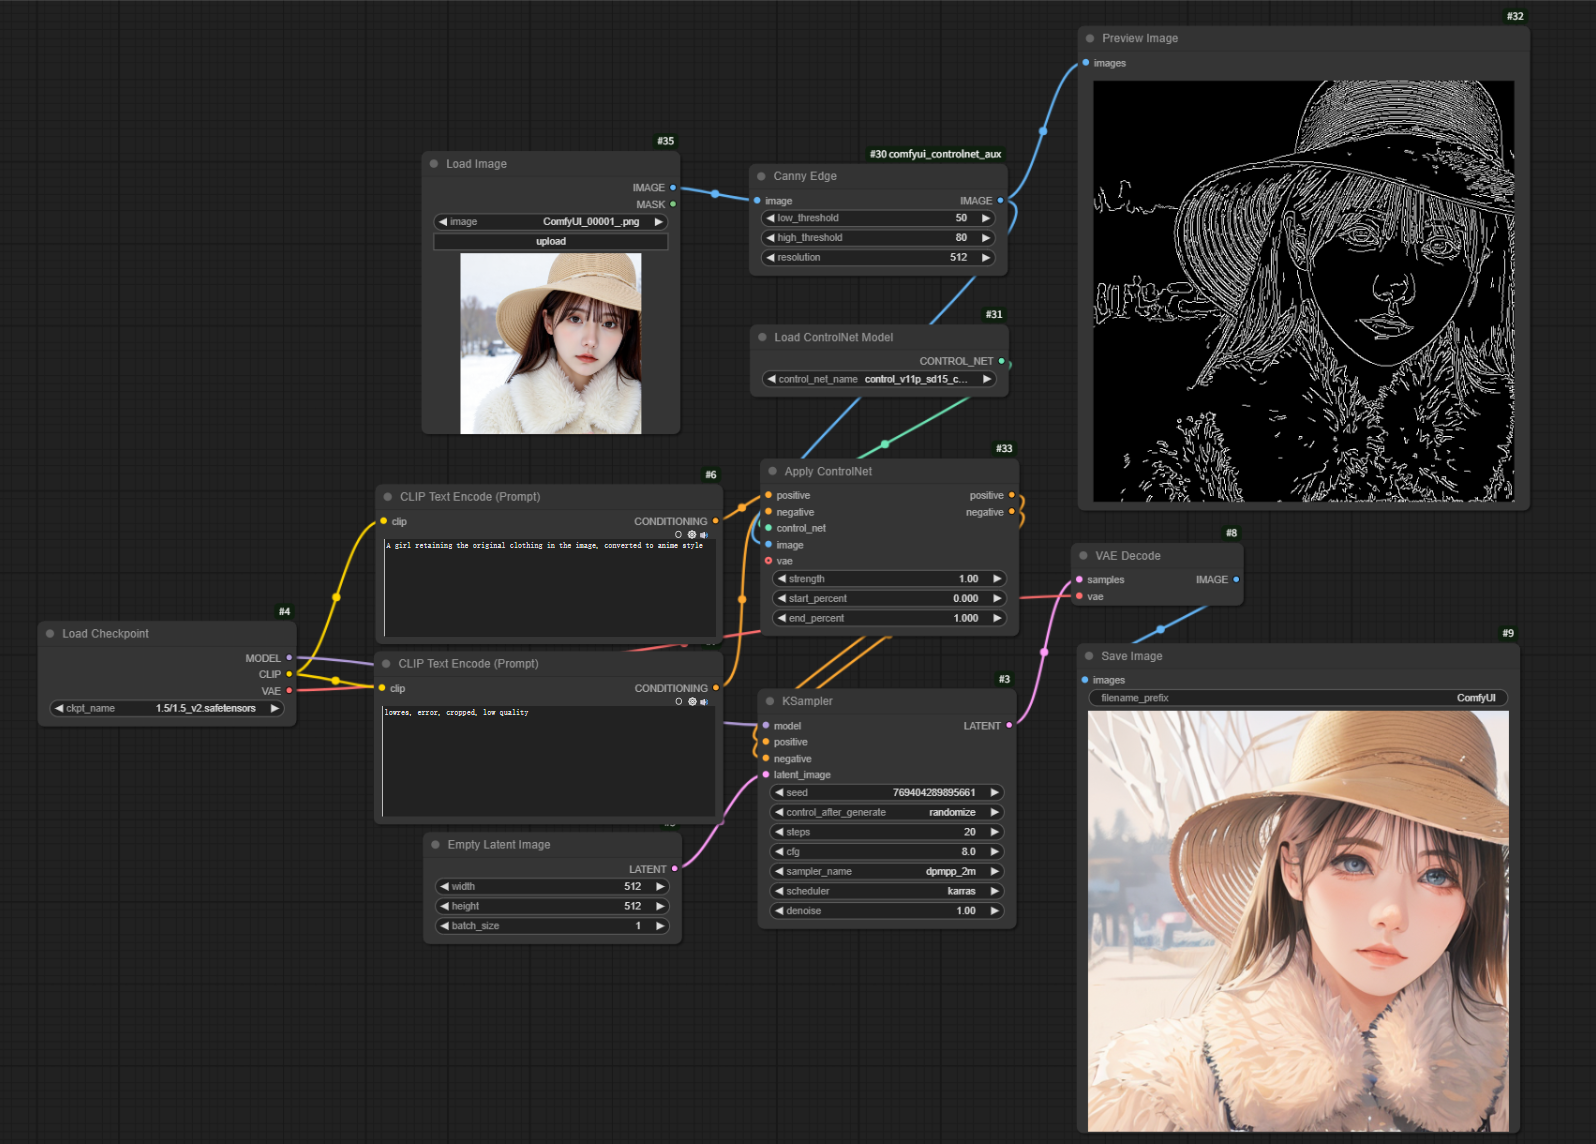
🧩 Example Workflow: Realistic Portrait → Anime Style
Here’s how to build a Canny-based workflow in ComfyUI to turn a real portrait into anime-style artwork:
1.Create Nodes
Open ComfyUI, load your text-to-image workflow, and add a “Canny Fine Edge Preprocessor” node.
Connect it to “Load Image” and “Preview Image” nodes, then upload your source photo.
2.Load ControlNet Model
Add “ControlNet Loader” and “ControlNet Apply” nodes.
In the loader, select control_v11p_sd15_canny, and connect it to the preprocessor output.
3.Integrate into Main Flow
Connect “ControlNet Apply” between the “CLIP Text Encoder” and the “K Sampler.”
4.Select Checkpoint Model
Use an anime-style model, e.g., counterfeitV20_v30.safetensors.
5.Enter Prompts
- Positive prompt:
anime, 1girl, outdoors, short hair, green shirt, depth of field... - Negative prompt:
lowres, error, cropped, low quality...
6.Adjust Parameters
- Threshold: 50–80
- Resolution: same as source (e.g. 512)
- Control Strength: 1
- Size: 512×512
- Steps: 20 | CFG: 8
- Sampler: dpmpp_2m | Scheduler: karras
7.Generate
Click “Add Prompt Queue” to generate the anime-style result.
2.Introduction to the SoftEdge Model
Unlike Canny, SoftEdge extracts smoother, more natural edge transitions — ideal for illustration, oil painting, or 3D anime-style works.
It generates blurred yet coherent outlines, giving the image a soft and artistic feel.
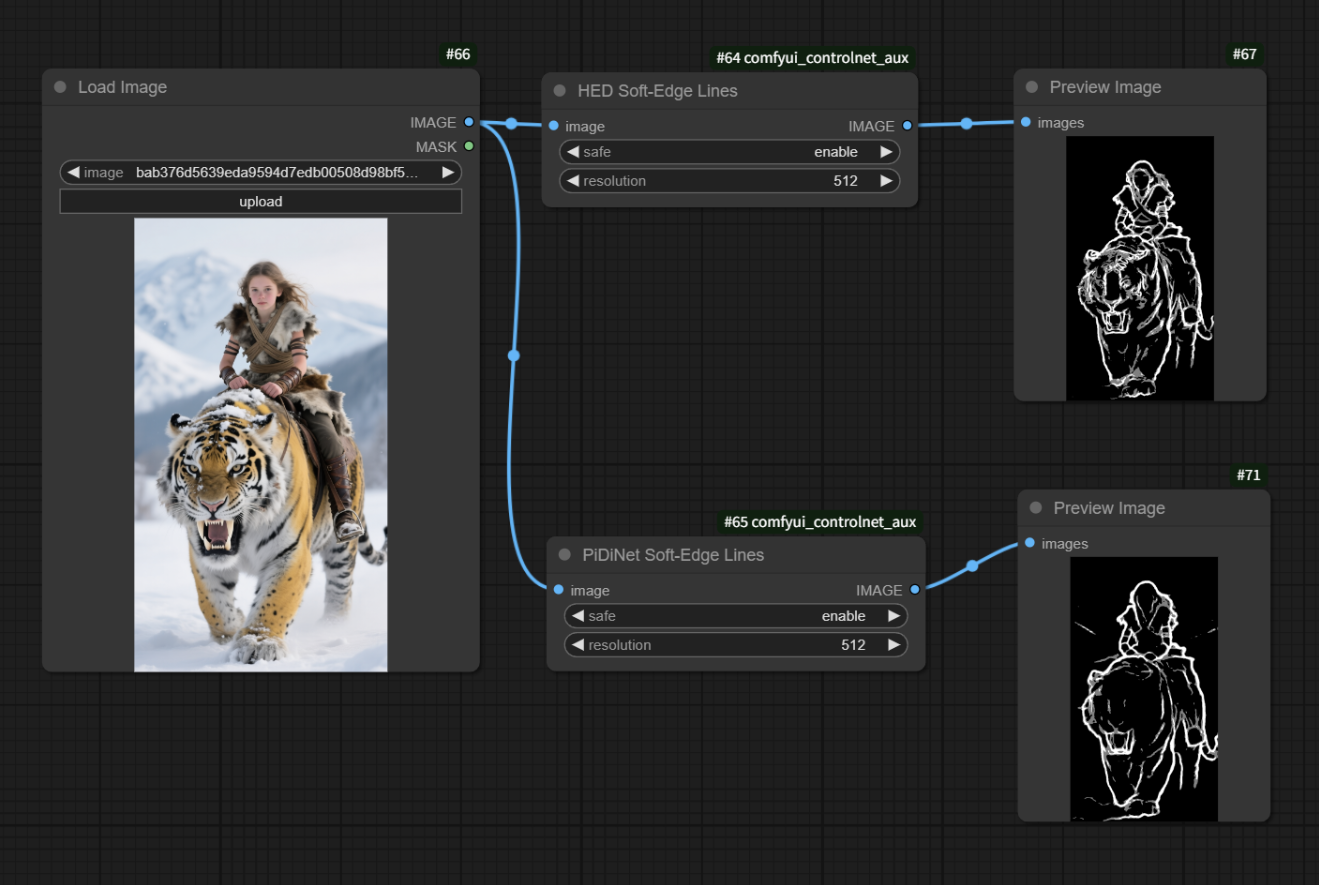
⚙️SoftEdge Preprocessor Nodes
SoftEdge provides two preprocessor options:
- HED Soft Edge Preprocessor
- PidiNet Soft Edge Preprocessor
Both include:
- Stabilize — enhances contrast and reduces excessive blur.
- Resolution — controls detail level in the output sketch.
Algorithm Comparison
| Preprocessor | Algorithm | Features & Use Cases |
|---|---|---|
| HED | Holistically-Nested Edge Detection | Produces smooth edges; best for hand-drawn or artistic styles. |
| PidiNet | Pixel Difference Network | Extracts clearer edges; better for structured scenes. |
🧩 Example Workflow: Stylized Portrait Generation
The setup is similar to Canny — just replace the preprocessing node with SoftEdge.
Here’s how to create an “oil painting portrait” workflow:
1.Create Nodes
Add an “HED Soft Edge Preprocessor,” connect it to “Load Image” and “Preview Image,” and upload your material.
2.Load Model
Choose control_v11p_sd15_softedge_ip in the “ControlNet Loader” and link it to the preprocessor.
3.Integrate into Main Flow
Connect “ControlNet Apply” between “CLIP Text Encoder” and “K Sampler.”
4.Select Checkpoint Model
Use an oil-painting model like SHIMILV_OilPainting_V2.1.safetensors.
5.Enter Prompts
- Positive:
1girl, jewelry, hanfu, outdoors, lake, red lips, upper body... - Negative:
lowres, error, cropped, low quality...
Set Parameters
- Stabilize: enabled
- Resolution: match source (e.g., 768)
- Control strength: 1
- Output: 512×768, Steps: 25, CFG: 7, Sampler:
dpmpp_2m
Generate
Click “Add Prompt Queue” to create an oil-painting-style portrait.
Summary
- Canny: great for clear, structured images like realistic-to-anime conversions.
- SoftEdge: ideal for softer artistic transitions like illustrations or oil paintings.
Both models give creators precise, controllable results in ControlNet.
Whether you’re a beginner or an experienced artist, tuning parameters and combining models will help you find your ideal creative balance.
Unlock Full-Powered AI Creation!
Experience ComfyUI online instantly:
https://market.cephalon.ai/share/register-landing?invite_id=RS3EwW
Join our global creator community:
https://discord.gg/MSEkCDfNSW
Collaborate with creators worldwide & get real-time admin support.