SDXL Standard Workflow Explained: From Setup to Practice

Overview
When using ComfyUI for image generation, SDXL is one of the most widely used high-quality models. The standard SDXL workflow consists of two main components: the Base model and the Refiner model. These models work together to generate more detailed and natural-looking images. In this guide, we'll walk you through setting up a complete SDXL workflow and provide a practical example to help you understand the role of each node.
1. Preparation: Models and Files
Before starting, make sure you have downloaded the following model files:
- SDXL Base Model
- SDXL Refiner Model
- SDXL VAE Model (sdxl-vae1.0.safetensors)
The Base model generates the core structure of the image, while the Refiner model refines the details and texture. Using both models together achieves the best results.
Launch the ComfyUI application on the Cephalon Cloud platform to experience it immediately
2. Steps to Set Up the Standard Workflow
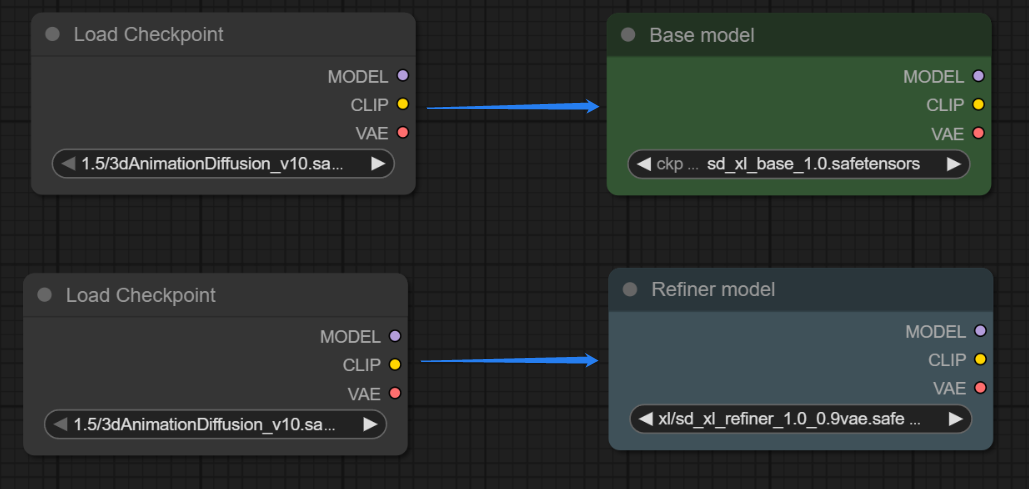
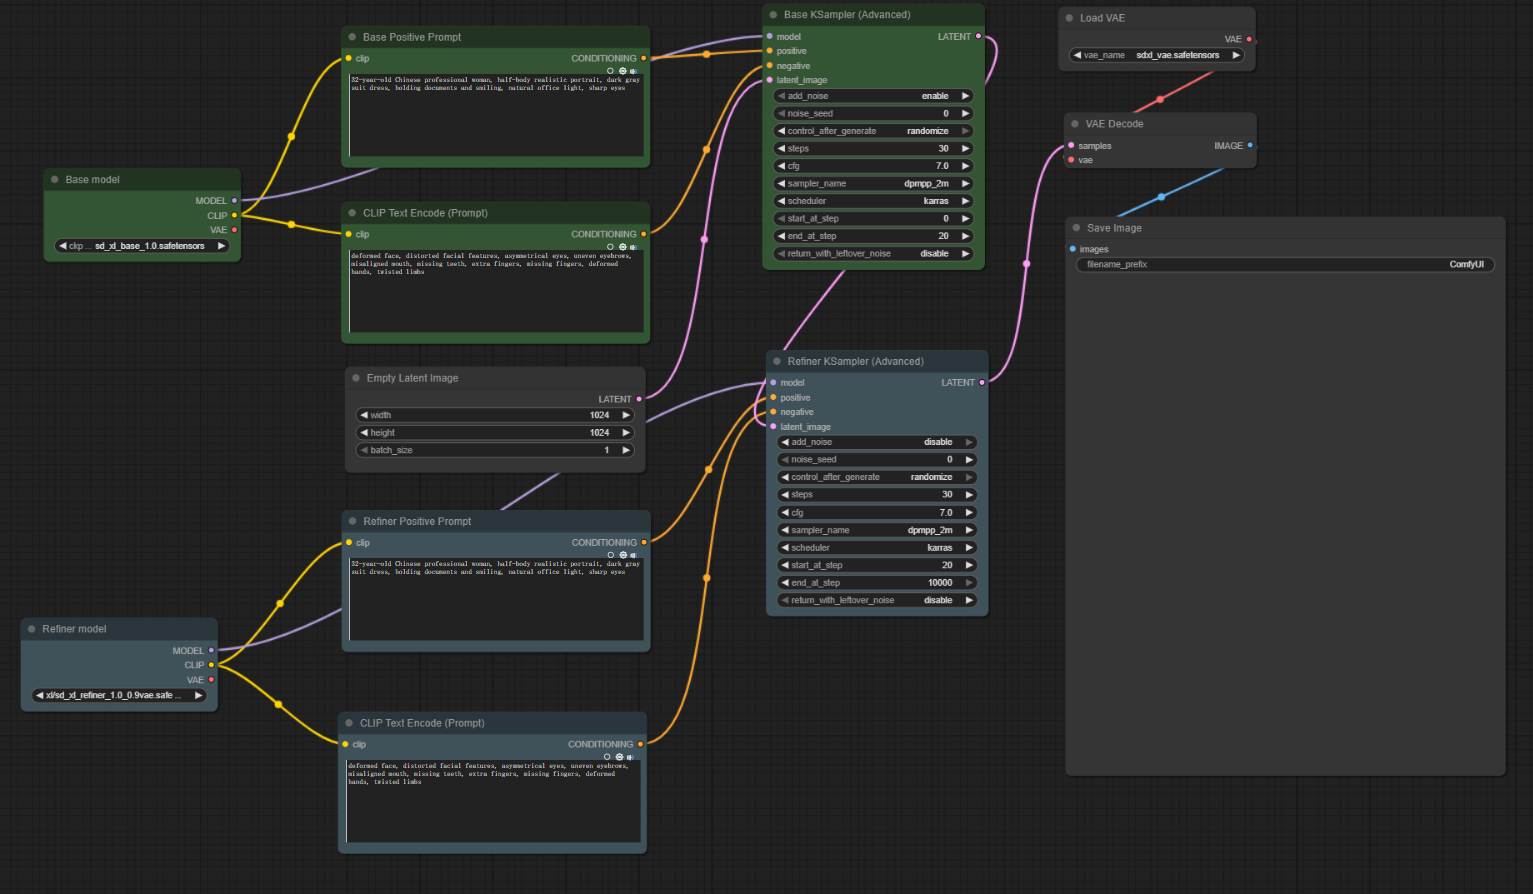
2.1 Load the Models: Base and Refiner
In ComfyUI, create two “Checkpoint Loader (simple)” nodes:
- The first one loads the Base model.
- The second one loads the Refiner model.
To make them easier to distinguish, it's recommended to rename the nodes and assign different colors, e.g., green for Base and blue for Refiner.
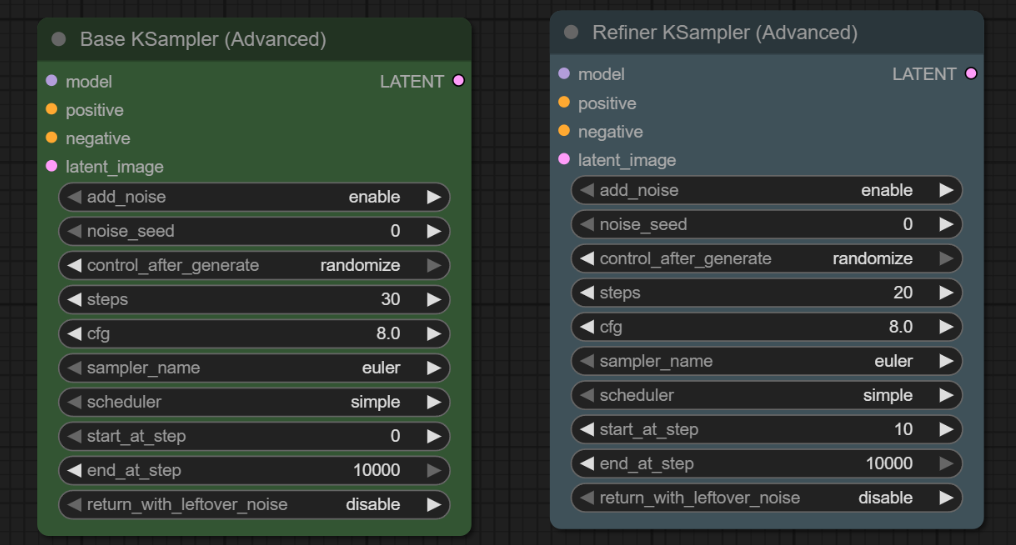
2.2 Add Sampling Nodes: Control the Generation Process
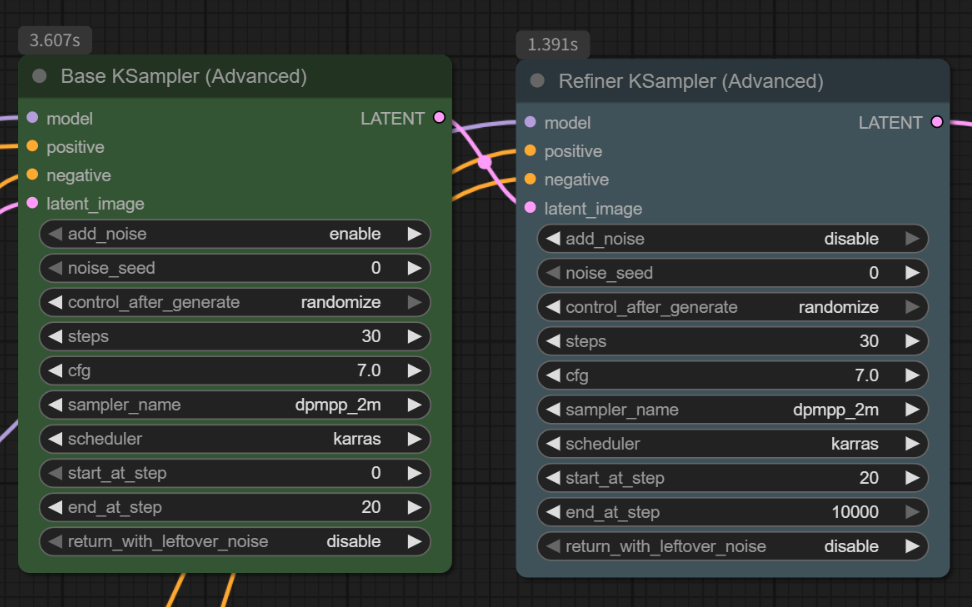
Next, create two “K Sampler (advanced)” nodes, one corresponding to the Base model and the other to the Refiner model. These nodes control the generation steps and noise reduction process.
Main parameters:
- Add Noise: Decides whether to enable the random seed.
- Start/End Denoising Steps: Controls when the denoising starts.
- The Base model typically starts at step 0.
- The Refiner model should start from the step where the Base model ends.
- Return Noise: Passes random noise to the next sampler.
Once set up, the Base model's output will smoothly transfer to the Refiner model for refinement.
2.3 Prompt Encoding: CLIP Text Nodes
Create four “CLIP Text Encoder” nodes for both positive and negative prompts of Base and Refiner. The prompt groups can be the same, but make sure the names are clear:
- “Base Positive Prompt”
- “Base Negative Prompt”
- “Refiner Positive Prompt”
- “Refiner Negative Prompt”
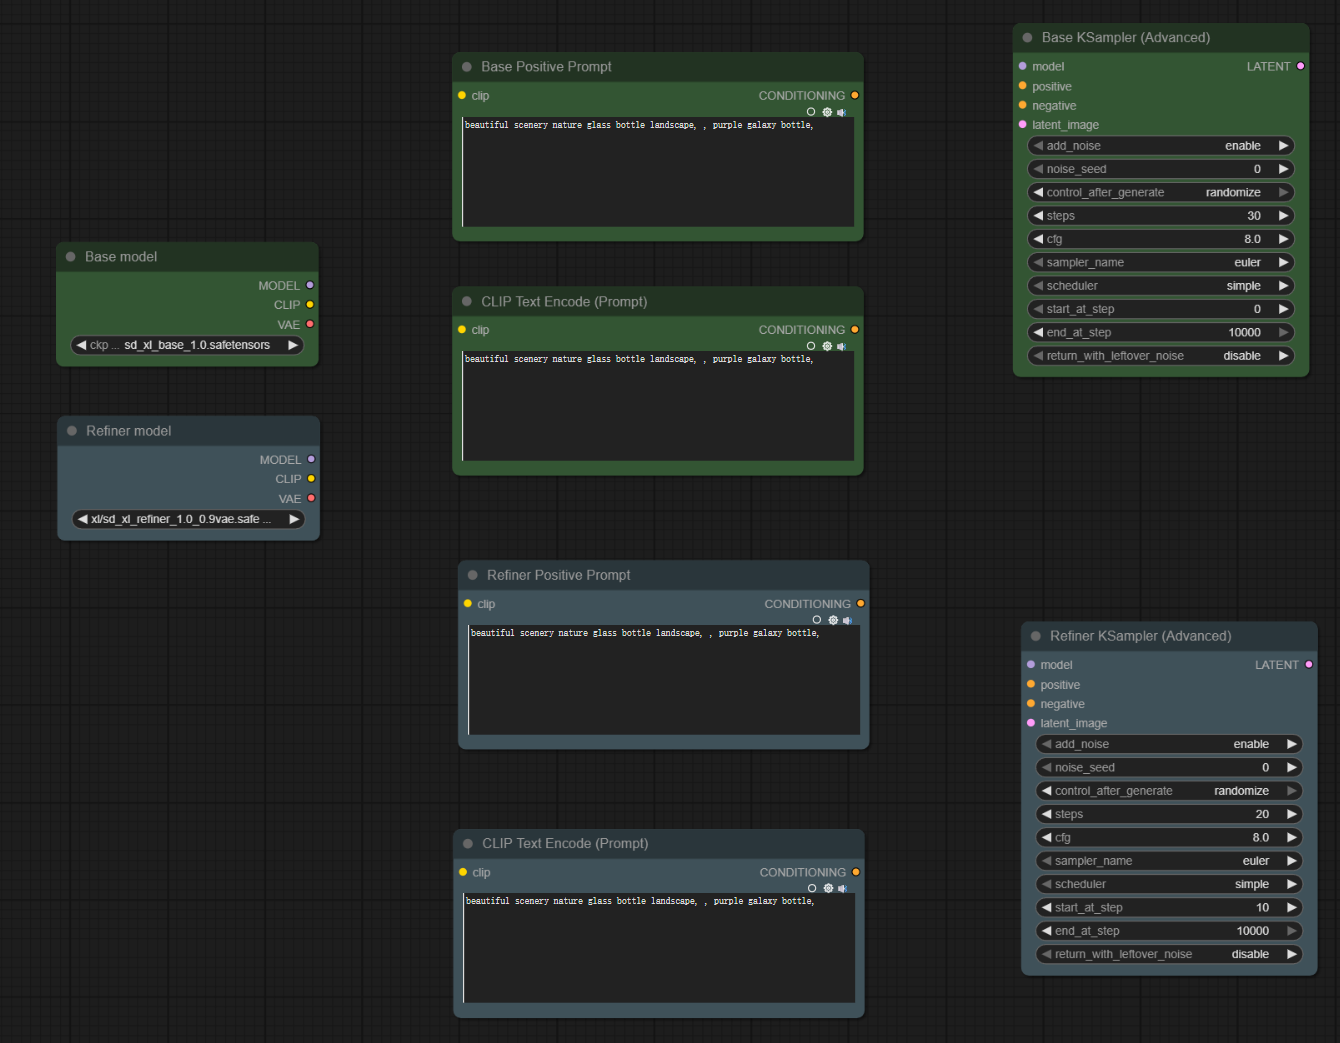
2.4 Load the VAE Model
Create a “VAE Loader” node and select the SDXL-specific VAE file.
If the model already includes a VAE, this step can be skipped; however, using a separate VAE generally leads to more stable output.
2.5 Connect the Sampling Workflow
Create an “Empty Latent” node to initialize latent space data.
Here’s how to connect them:
- Empty Latent → Base Model Sampler
- Base Model Sampler Output → Refiner Model Sampler
- Refiner Output → VAE Decode
Now, the complete SDXL workflow is set up.
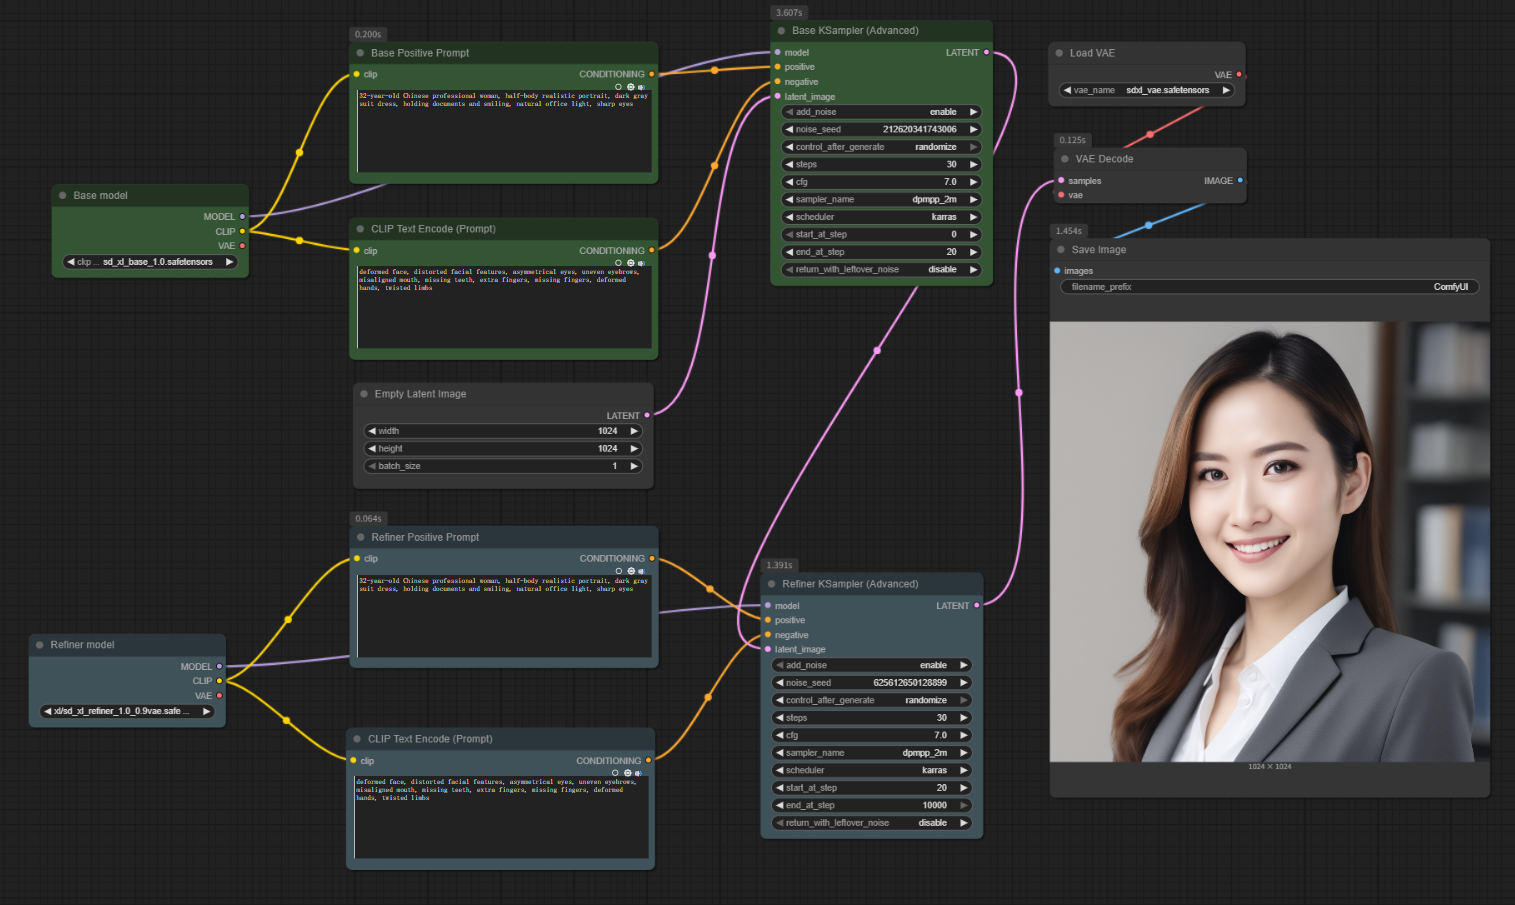
3. Practical Example: Generating a Realistic Portrait
To help you understand the role of each node, let’s walk through a practical example of generating a realistic portrait.
3.1 Select Models
Load the SDXL Base and SDXL Refiner models in the two "Checkpoint Loader" nodes.
3.2 Set the Prompts
Positive Prompt:
"32-year-old Chinese professional woman, half-body realistic portrait, dark gray suit dress, holding documents and smiling, natural office light, sharp eyes."
Negative Prompt:
"deformed face, distorted facial features, asymmetrical eyes, uneven eyebrows, misaligned mouth, missing teeth, extra fingers, missing fingers, deformed hands, twisted limbs."
Feel free to modify the prompts according to your needs.
3.3 Image Size
Set the output resolution in the Empty Latent node.
Recommended size: 1024×1024 (SDXL models perform poorly at lower resolutions).
3.4 Base Model Sampling Parameters
- Add Noise: ✅
- Return Noise: ✅
- Random Seed: 0
- Sampling Steps: 30
- CFG: 7
- Sampler: dpmpp_2m
- Scheduler: karras
- Start Denoising Steps: 0
- End Denoising Steps: 20
3.5 Refiner Model Sampling Parameters
- Add Noise: ❌
- Return Noise: ❌
- Random Seed: 0
- Sampling Steps: 30
- CFG: 7
- Sampler: dpmpp_2m
- Scheduler: karras
- Start Denoising Steps: 20
- End Denoising Steps: 100
3.6 Generate and Save
Click Add Prompt Queue to generate the image.
Right-click on the Preview Image node and select Save Image to save it locally.
4. Conclusion
The core of the SDXL standard workflow is the two-stage structure: the Base model for composition and the Refiner model for refinement.
Once you understand the role and connections of each node, you’ll be able to easily adjust prompts, steps, or VAE models to create your own high-quality workflows.
Unlock Full-Powered AI Creation!
Experience ComfyUI online instantly:
https://market.cephalon.ai/share/register-landing?invite_id=RS3EwW
Join our global creator community:
https://discord.gg/MSEkCDfNSW
Collaborate with creators worldwide & get real-time admin support.